Sunday, December 30, 2012

Pumpkin Chocolate Chip Cookies

I know the season for pumpkin-things has basically passed, but my general philosophy is eat what you want when you want it. All in moderation. So this week I wanted something pumpkin. This recipe is just a simple twist on the traditional chocolate chip cookie, but it's a twist that I think makes a world of difference. By adding pumpkin puree to the cookie batter, you get a fall and winter-appropriate cookie great for the holidays.


Ingredients (makes roughly 30 cookies)

1/2 cup melted butter (1 stick)
1/2 cup white sugar
1/2 cup brown sugar
1 large egg
1/2 cup pumpkin puree
1/2 tsp vanilla extract
1 tsp baking soda
1 1/2 cups all-purpose flour
1/2 tsp ground cinnamon
A little less than 1/4 tsp nutmeg
A little less than 1/4 tsp gound cloves
1/4 tsp ground ginger
1/4 tsp salt
1 cup, about half a bag, of dark chocolate chips


Procedure 

1) Heat oven to 350 degrees and line your cookie trays with parchment paper.

2) In a medium sized mixing bowl, beat the butter with a mixer until smooth. Beat in the white and brown sugar until the mixture is fluffy. Add in the egg and continue to beat, followed by the vanilla extract and pumpkin puree. Feel free to use more than 1/2 cup of pumpkin puree, it's really a matter of preference.

3) In a large mixing bowl, whisk together the baking soda, flour, cinnamon, nutmeg, cloves, ginger, and salt.

4) Slowly add the wet batter to the flour mixture and beat until smooth and the batter is one even texture. Stir in the chocolate chips until they're evenly distributed.

5) Use a small ice scream scoop to scoop the cookie dough onto the cookie sheets. Bake for 15 minutes or until the edges look crisp. Once cooked, allow the cookies to cool before removing from the sheet.


I hope everyone has a wonderful New Year and a great start to 2013. With all of these holidays underway, I must say I've really been missing my sister lately, who's been in London now for 6 months. Exactly two months ago we were in France together traveling with our friend Nisha. It was the perfect vacation except for the fact that it had to end.

Me and Rona in Nice, France

She'll be happy to know one of my New Year's resolutions this year is to stick to our FaceTime at least once a week rule.

Happy New Year everyone!

~ Alyssa

Friday, December 21, 2012

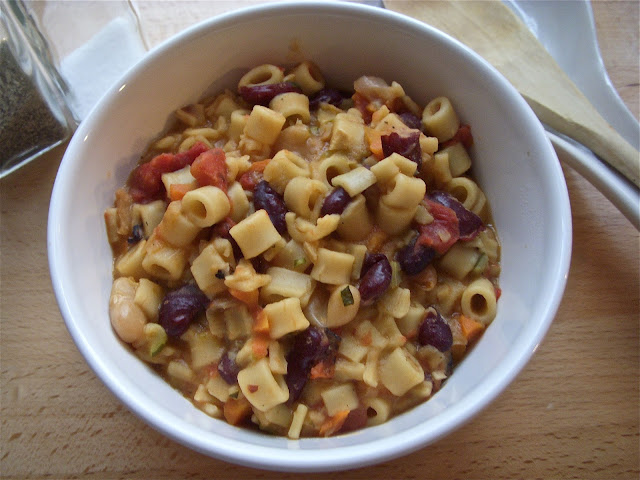
Back to Blogging: Minestrone Soup

It's pretty incredible how much can change over a short span of time. Take our Two Minds Cook Alike description for instance:

"We are two sisters in two kitchens, living in New Jersey/New York."

This was written when I was living in NJ at home with my parents and my sister was pursuing her masters at NYU. Yes, I'm still in NJ, but I'm now living with a childhood friend in our own apartment in Hoboken. My sister has since had two HUGE moves, from New York to Istanbul shortly followed by another move from Istanbul to London. On top of that, she's had another huge life change: an engagement to her amazing boyfriend (now fiance.) It's funny how relationships change, friendships change, and even homes change in a time as short as 1 year.

So aside from needing to update our blog's description, I also need to say I'm happy to be back and blogging again. Sometimes the creativity comes in spurts, as well as the free time. But for when it's available, I hope our dedicated readers, who I'm sure have forgotten about us in our 8 months of absence, will come visit Two Minds Cook Alike again to see what's cooking in our new kitchens.

Today's blog post, in honor of this cold gloomy day, features a hearty Minestrone Soup. I made a massive batch of this soup and gave some to my boyfriend's family to try and they all seemed to love it. Given he comes from a big Italian family, their praise felt like a huge accomplishment.


Ingredients (serves 6-8)
2 tablespoons extra-virgin olive oil
1 large onion
4 cloves garlic, minced
2 stalks celery, diced
2 carrots, diced
1 small zucchini, diced
1 tsp dried oregano
1 tsp dried basil
1 tsp dried thyme
Kosher salt to taste
Pepper to taste
1 28 oz. can Hunt's Fire Roasted Diced Tomatoes
1 14 oz. can crushed tomatoes 
6 cups low-sodium chicken broth (homemade always preferred, but I had to use store bought this time)
1 15 oz. can low-sodium kidney beans, drained and rinsed (cooked fresh is an option also)
1 15 oz. can cannellini beans, drained and rinsed
3 cups ditalini pasta, cooked (I like a lot of pasta in my soup!)
2 bay leafs


Procedure

1)  Heat the olive oil in a large pot over medium heat. Once hot, add the onion and garlic and cook until the onion is translucent, about 5 minutes.

2) Add the celery, carrot, and zucchini and cook until they begin to soften, approximately another 5 minutes. Stir in the salt, pepper, oregano, basil, an thyme and cook for a few more minutes.

3) Add the diced tomatoes, crushed tomatoes (I personally do not like chunky tomatoes so I would have preferred to purée them in a blender in retrospect), chicken broth and bay leaves to the pot and bring to a boil. Once boiling, reduce the heat to low and let simmer for 10 minutes.

4) Stir in the beans and let simmer for another 15-20 minutes. As the soup is cooking, cook the pasta separately. I prefer to cook the pasta separate from the soup because it allows me to make sure they're perfect al dente.

5) Season with a little more salt if you'd like. Then add the pasta after the soup has cooked and serve! Feel free to garnish with any fresh herbs, like basil or parsley.

When I finished cooking the soup, it felt a little too thick so be sure to add water or more broth, depending on your preference.


Thanks for reading! I highly recommend trying this one.

~Alyssa

Friday, April 20, 2012

Chocolate Orange Almond Cake (Flourless)

When it comes to baking, there are some recipes that are just plain easy.

You find yourself using only one bowl, or two at the most. There is no stand mixer involved or even an electric mixer. You get to the end of the recipe and haven't even broken a sweat, it is that easy.

This chocolate cake is not one of those recipes.


You may be thinking to yourself that it is just a chocolate cake, is it really that difficult to make?

And the answer is, this cake is no 'piece of cake'. (Pun intended!)


It required no less than a food processor, an electric mixer, a grater, 3 mixing bowls, and the other usual measuring cups and spoons.  

Sure, reading this list makes it feel like I am complaining for nothing. However, in my defense, I do not have a food processor or an electric mixer so I had to be creative.

And for me, being creative usually leads to making a big mess.


Now, talking about the cake. Once it was done and the kitchen was clean, I was tired.  The cake however, did make me feel better!

It was moist, light, and fluffy. I felt like I was eating a brownie, only less dense, with a hint of citrus, and definitely more guilt-free. The cake does have texture from the nuts, but I think that could have been solved with a food processor and a lot of processing.

In the end, despite its success, I decided that this is cake will be a special occasion only cake. It looks good, taste delicious, and would be sure to impress guests. But as someone who is not a big chocolate person, I could get through about half of the cake in a week.  And I hate not being able to finish something I made while it is still fresh!


Happy weekend everyone!


Chocolate Orange Almond Cake
Adapted from bonappetit.com

Melted butter for the pan
1 1/4 cups whole almonds (6 to 7 ounces)
1 cup sugar, divided
6 ounces bittersweet (not unsweetened) or semisweet chocolate, coarsely chopped
1/2 cup unsweetened cocoa powder
1/2 cup orange juice
2 teaspoons grated orange peel
6 large eggs, separated
1 vanilla bean, split lengthwise
1/4 teaspoon salt


1. Preheat oven to 350°F. Brush bottom of 10-inch-diameter springform pan generously with butter. 


2. Blend almonds and 1/4 cup sugar in processor until almonds are finely ground. Add chocolate; blend until chocolate is finely ground, scraping sides and bottom of bowl occasionally.


3. In a small bowl, whisk cocoa, orange juice, and orange peel in until smooth. Set aside.


4. In a large bowl, combine egg yolks and 1/2 cup plus 2 tablespoons sugar. Scrape in seeds from vanilla bean. Then, using electric mixer, beat until yolk mixture is very thick, about 4 minutes. Beat in cocoa and orange mixture. 


5. Fold in the ground almond and chocolate mixture into the egg yolk mixture and set aside.


6. Using clean dry beaters, beat egg whites and salt in another large bowl until soft peaks form. Gradually add 2 tablespoons sugar, beating until whites are stiff but not dry. 


7. Fold whites into chocolate batter in 3 additions. Transfer to prepared pan.


8. Bake cake until tester inserted into center comes out clean, about 40 minutes. Cool cake completely in pan on rack. 


Enjoy!


Rona


Wednesday, April 18, 2012

Creamy Cheddar Potato Soup

This past weekend was one of those weekends?  You know, the type where you kind of look at yourself and did I just do that?

Everyone has their forgetful moments but for the most part, I am the type of person who remembers to turn things off, to take my keys, phone, and wallet with me every time I leave the house, and to turn off the lights and lock the doors.  Or so I thought.


The weekend started with me realizing that I had left my hair straightener on overnight.  Not a big deal but I usually remember to both turn it off and to unplug it after use.  

And leaving it on overnight is much better than that one time in college when I curled my hair (rare enough as it is) and one week later picked the curling iron up off the floor to put it away, only to burn my fingers because it was still on! Leaving a hair tool on for a week is a record that I hope I do not break!

For most people, the hair straightener incident would give the hint to pay closer attention to turning things off... but not for me. My brain must have been in a thick fog.

Soon after that I proceeded to leave the house while leaving the tea pot on.

Now wait, stop, don't panic yet!

It was an electric stove that was on, the heat was at the lowest setting. I left a Turkish tea pot on, which is consists of two pieces: a top with brewed tea and a bottom with water. There was plenty of water and the heat was not strong enough to boil the water.

After leaving the house and proceeding with my day, my mind finally came to realize the error I had made! It only took about 2 hours. And a running home we went.  

We arrived home to a working stove top, warm water, and no fires or other major disasters.  Just that feeling of did I really just do that?


The answer is yes! Yes, I just did that. (Hanging my head in shame).
 
Some emotional traumas can only be cured with really good comfort food.  In this case, a bowl cheddar potato soup did the trick. I made this soup last week because I had a huge block of cheddar cheese that I needed to finish and I am so happy that I did. The soup is smooth and creamy and delicious.  I was eating two bowls at a time.

If you love potatoes and cheese then what is not to love about this soup? It is so easy to make that I am getting hungry from looking at these pictures and I am tempted to go make another pot.

Creamy Cheddar Potato Soup
Makes 8-10 portions

Ingredients
1/3 cup chopped onions
2 tablespoons butter
3 large potatoes, peeled and diced
3 cups vegetable broth
2 cups shredded cheddar cheese
2 cups milk
1/4 teaspoon pepper
1/4 teaspoon paprika

1. In a large pot, saute the onions in butter until they become tender.

2. Add in the potatoes and broth and bring to a boil.  Reduce the heat, cover the pot, and simmer for 15-20 minutes until the potatoes become soft.

3. Using a hand blender, puree the soup until smooth.

4. Add in milk, cheese, pepper, and paprika.  Stir over low heat until the cheese is completely melted.  (I used my hand blender and pureed the soup one more time to break up the cheese and to get a creamy texture).

Enjoy!

Rona


Thursday, April 12, 2012

Honey Nut Cake in Syrup

As a kid, I remember thinking that the 8 days of Passover were never-ending. We usually had the majority of the holiday off from school and I have memories of sitting around with Alyssa and other friends in the kitchen searching for something to eat and fighting our cravings for pizza and tacos. 

My parents cooked a lot but they were never big bakers so our Passover sweets were usually store bought and not very satisfying. Just chocolate covered matzah, coconut macaroons, and raspberry rolls.  

But with time, not eating bread products or legumes has gotten much easier. This year, I was looking forward to having a forced adjustment to my diet. I find my diet to be too bread heavy. Partly because restaurants in Turkey usually serve food with a basket of bread. And if there is bread in front of me it is often hard to avoid taking a slice. But also, much of the snacks and street food are made of bread and when running around during a busy day that is what I end up eating.

For this Passover, I had several main courses in mind that I planned to make. Desserts, on the other hand, I was unsure about.  I have not done a lot of successful Passover baking in the past.  So I started with this cake.  It is a simple cake, that is incredibly easy to make and the batter requires little time to prepare.  It has a flavor of nuts, without being overpowering. With the honey syrup, you end up with a cake that is a little bit of a citrus flavor that balances out the sweetness. Considering how easy it was to prepare and how quickly it was eaten, this cake is a winner, Passover or not.


Honey Nut Cake in syrup
adapted from epicurious.com

Ingredients
Makes 1 cake


3/4 cup granulated sugar
1/4 cup brown sugar
1/4 cup vegetable oil
3 eggs
3 tablespoons orange juice
1 teaspoon finely minced orange zest
1/4 teaspoon salt
1/4 teaspoon ground cinnamon
1/2 cup matzoh cake meal
1/2 cup finely chopped hazelnuts or almonds
1 cup finely chopped walnuts

Soaking Syrup

2/3 cup granulated sugar
1/4 cup honey
1/3 cup orange juice
1/4 cup water
1 tablespoon lemon juice
1/4 teaspoon ground cinnamon

1. Preheat the oven to 350°F. Generously grease a 7-inch round layer cake pan.

2. In a medium-sized mixing bowl, beat the granulated and brown sugars with the oil and eggs until the mixture is thick and pale yellow. Stir in the remaining batter ingredients. 

3.  Pour the batter into the greased cake pan and bake for 35 to 40 minutes, or until the top is light brown and set. Cool for at least 20 minutes. 

While the cake is baking you can prepare the soaking syrup.

4. In a medium saucepan, combine the ingredients. Heat to dissolve the sugar and simmer for 5 to 10 minutes, until the mixture becomes syrupy. Cool well.

5.  Pour the cooled syrup over the cooled cake, poking holes in the cake with a fork, to permit the syrup to penetrate. Let the cake rest for 1 to 2 hours to soak the syrup and get moist and then serve.

Enjoy!
~Rona

Sunday, April 8, 2012

Happy Passover!

Happy Passover to all who celebrate, and for those who don't, there's nothing to say you can't enjoy some Jewish comfort food as well! Because really, that's what matzo ball soup is--good ole heart-warming, feeling down, comfort food. And you don't have to just wait until Passover either for an occasion to make it. Matzo ball soup is like chicken soup, good for any and all of life's problems. Am I right?


If you have never made matzo ball soup before, don't fret. It's really pretty simple and fool-proof. The only challenge can be getting each matzo ball to the desired fluffiness level, but to me that's all just a game of luck.


So for some amazing fluffy balls (giggle), follow along:

 Ingredients (makes about 8 matzo balls)
1 cup matzo meal
4 eggs, beaten
1/2 stick margarine, melted
Salt, to taste
Pepper, to taste
4 tablespoons chicken broth
Fresh dill, shredded (optional)
Fresh parsley, shredded (optional)


Procedure
1) Mix together the egg, margarine, and chicken broth in a large bowl. Add the matzo meal, shredded herbs, salt and pepper and mix well until you have an even consistency.

2) Cover the bowl and refrigerate for approximately 30 minutes.

3) Fill a large pot with chicken broth (homemade is always preferred) and bring to a boil. If you do not have broth, you can also make the matzo balls in salted water.

4) After 30 minutes, take the mixture out of the refrigerator and gently roll 1-1 1/2 inch balls in your hand. It's helpful to wet your hands slightly before rolling the balls so the mixture does not stick to your hands.

5) Add the newly formed balls into the boiling broth and cook for 30 minutes, covered.

6) Serve with chicken broth, and garnish with dill.

And the last step--enjoy before it's all gone.


Thanks for reading!

~Alyssa

Monday, March 12, 2012

Eggplant Phyllo Pie

A few days ago, my boyfriend and I went and saw The Descendants.  Although we had assigned seats in the theater, a 10 minute intermission, and Turkish subtitles for the film, when the movie ended I had one of those moments when I had absolutely no idea where I was.  I thought to myself that the theater could be anywhere or in any of the places that I have visited before.  It was a fleeting feeling but such an innocent thought that I tried to hold on to it and savor it for a few moments.


These eggplant phyllo pies remind me of that feeling.  The ingredients are so simple and easy to find across cultures.   The pistachios, red pepper flakes, and mint leaves are so common in Turkish cuisine, but this recipe was found on an American website.  The phyllo dough makes me think of baklava, which has also been adapted by many countries.  Mint leaves make me think of Indian and Mediterranean cuisine.  Overall, I would say that this is a multi-cultural appetizer.

As for the taste, with each bite of the pie, I kept thinking that they tasted like little eggplant pizzas.  Wait, you may be thinking...is that a reference to something?  Are eggplant pizzas common?  I honestly have never had an eggplant pizza but if I ever decide to make one I would expect it to taste this way.  The phyllo dough serves as a flaky crust, the eggplant is meaty enough that there is no need for sauce, and the cheese, mint and spices compliment the ingredients with flavor and spice. 


And as a side note, I do not know what magic happened while taking these pictures but they are my absolute favorites of all time on this blog.  Maybe this is a pretty big statement to make but I think I raised the bar for myself and I hope that I can find this same magic in future picture taking.

Eggplant Phyllo Pies, adapted from Martha Stewart
Makes 6 pies

1 large eggplant, cut in half
Olive oil, for brushing
Salt and pepper
1/2 cup crumbled feta cheese
1/4 cup chopped pistachios
1/4 teaspoon ground coriander
1/4 teaspoon red pepper flakes
2 tablespoons fresh mint leaves, finely chopped
5 sheets of phyllo dough, thawed

1.  Preheat oven to 400 degrees. Lightly brush cut sides of eggplant with oil and season with salt and pepper. Place eggplant, cut side down, on a parchment-lined baking sheet. Bake until tender, 20 minutes or more if the eggplant is large.  (I actually did this step a day ahead, to save some time when preparing the pies).

2.  Reduce heat to 375 degrees. When the eggplant is cool enough to handle, scrape flesh from skin and roughly chop. Transfer eggplant to a medium bowl and add feta, 3 tablespoons pistachios, coriander, red-pepper flakes, and mint. Season with salt and pepper and stir to combine.

3.  Lightly oil 6 standard muffin cups. Lay 1 sheet phyllo on a work surface and, with a pastry brush, lightly brush with oil. Stack 4 more phyllo sheets on top, brushing each with oil. Cut into 6 squares. Gently press one square into each muffin cup and fill with 1/4 cup eggplant mixture.

4. Gently fold over corners of phyllo to enclose filling. Brush tops with oil and sprinkle with 1 tablespoon pistachios. Bake until golden, 20-25 minutes. Let cool and then serve the pies warm or at room temperature.

Enjoy!

~Rona

Sunday, March 11, 2012

Life in Photos


1. A happy discovery of a Thai restaurant
2. Green tea along with Thai lunch
3. Walking along the Asian side of the city
4+5. 2 Dali sketches.  Small, full of detail, and beautiful.
6. Picked up a small jam jar for $2.  I decided that it was so cute that I should use it to store my rings.  I am a sucker for glass domes!  Now, I want to buy several more and actually use them for jam and host large breakfasts.  Anyone want to come over for breakfast so that I have an excuse to buy more?


Friday, March 9, 2012

Raspberry Breakfast Financiers

It is funny how the mind works.  Back in New Jersey, I had a well stocked kitchen with tons of baking sheets, muffin pans, cake pans and other baking equipment that I did not use as often as I wanted.  As baking ideas came into my mind, I would add different food to my pantry with the intention of experimenting and pushing myself to bake more.  As expected, a lot of what I bought went unused and now I miss it all.

Here in Istanbul, I have already stocked up on the essential tools that I need for baking but maintaining a kitchen that is ready for baking takes up a lot of space.  After the recent pain of packing up my kitchen, I am trying to keep my kitchen under control.  Hah!  We will see how long that lasts considering that I want to bake much more than I did in my old apartment!

As for these financiers, I made them a few weeks ago.  I picked up almond meal in Trader Joes with the all the best intentions.  Having never used almond meal before, it sat for several weeks in my pantry.  Finally, after searching through a favorite cookbook, I realized that I could make financiers.  This cookbook has many recipes for financiers that features a large variety of flavor combinations.  For my first attempt at financiers, I decided to try a traditional recipe with only a few raspberries on top.  I must say that they were delicious!  Light and sweet with just a little bit of fruit to add to the flavor.  I have the almond meal with me here, next I hope to try a more flavorful financier.


Raspberry Breakfast Financiers
Makes 8  

Ingredients 

1 1/4 cups confectioners' sugar
2/3 cup all-purpose flour
1 cup almond meal
5 egg whites
1 1/2 sticks butter, melted
1/2 cup fresh or frozen raspberries
1/4 cup old-fashioned rolled oats

1. Preheat oven to 400 degrees.  Grease eight reccesses in a mini loaf pan.

2. Sift sugar and flour into a large mixing bowl.  Add the almond meal and stir to combine.

3.  In another bowl, whisk egg whites until frothy.  Stir into dry ingredients.  Then stir in the melted butter until combined.

4.  Evenly distribute the mixture between the eight recesses in the prepared pan.  Top with raspberries, pressing them gently into the batter.  Sprinkle with the rolled oats.

5.  Bake for 15-20 minutes, until golden and firm.

6.  Cool in the pan for five minutes and then transfer to a wire rack to cool.

Enjoy!

~Rona

Sunday, March 4, 2012

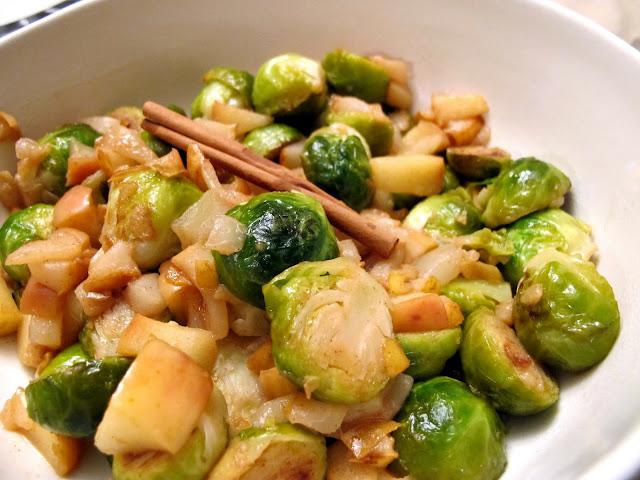
Cider-Cinnamon Brussels Sprouts

I guess now would be a good time for me to insert the standard excuses for how busy my life has been and to explain myself for neglecting my portion of the whole "two minds" framework. BUT it's true, my life has been going through some changes (nothing bad) that have required a lot of traveling and sacrifice of the free time I normally spend experimenting in the kitchen. That being said, I'm back in my rampant cooking mode, so let's hope I'm able to keep up with Rona on posting recipes.

To ease my transition back into the blogosphere, here's a very simple recipe that even the worst cook can handle.


If you like the taste of brussels sprouts, this is a great recipe that perfectly meshes their somewhat bitter taste with the sweet taste of the fruit.


Ingredients

1 tbsp olive oil
2 cups brussels sprouts, halved
1 large apple, diced
1 large pear, diced
1 cup apple cider
1/4 tsp cinnamon


Preparation

1) Heat oil in a large pan over medium heat.

2) Add brussel sprouts flat side down and flip once or twice, until browned, approximately 10-12 minutes.

3) Add the apple and pear and cook until soft.

4) Add cider and cinnamon and simmer until all of the liquid evaporates.


Easy peasy. Enjoy!

~A

Thursday, March 1, 2012

Quick and Easy Cooked Leek and Carrot

I want to share one of my absolute favorite dishes to make when I have little energy for cooking.  The prep takes about 5 minutes and the cooking takes about 20 minutes so it is perfect when I want to be in an out of the kitchen quickly.  This leek dish is a Turkish meal that my boyfriend taught me.  I have seen it on the menu at Turkish restaurants but I have never tried it so this is the only version that I know.  But it is delicious, healthy, and appropriate for a variety of diets. 


Cooked Leek and Carrots
Serves 3-4

4 stalks of leek, trimmed
1 carrot, peeled
1 tablespoon of rice
1 tablespoon olive oil
1 tablespoon tomato paste
Water

1.  Prepare the leek by washing it, cutting off the ends, and then splitting it in half along the entire length.  Cut it into pieces that are about 1.5-2 inches long and set aside.

2.  Cut the carrot in rounds of your preferred thickness.  I prefer them to be sliced as thinly as possible.

3.  In a large pan, heat 1 olive oil over medium-low heat.  Add the leek and carrots and cook for 2-3 minutes.

4.  Add the rice, tomato paste, and 1/2 cup of water to the pan.  Cook the leek for another 15-18 minutes until the leek is soft.   If the water evaporates too quickly, it may be necessary to add a little more. (but not too much, the final consistency should be a paste not be watery). Stir occasionally and keep an eye on the water level so that the leek doesn't burn.

Serve warm with rice or pilaf.

Enjoy!

~Rona

Life in Photos


1. At the airport 
2. View along the Bosphorus 
3. Istanbul traffic 
4. My favorite Starbucks, with the most amazing views 
5. Yummy macarons, raspberry was my favorite 
6. Mocha and dessert

The past few weeks have been a bit of a transition for me.  I am currently in Istanbul and will be for some time.  I also realized that in the past four years, since I have graduated college, I have moved over 9 times.  Some moves have been large, others smaller but I am pretty exhausted from all of the packing and moving.  I find that I am enjoying it less each time. 

Coming to Istanbul (for the second time) has left me in a bit of a 'shock'.  Not culture shock, luckily I have traveled enough that I can adjust to new surroundings.  It is more of a cooking shock.  As in, I find it difficult to find so many of the necessary items that I could easily pick up in any store in the US.  Because the few days I had to pack were so stressful and my suitcases were stuffed to maximum capacity, I ended up leaving behind most of my kitchen necessities in the US.  And yes, I agree, that was stupid. 

I thought that it would be easy enough to find what I need but after visiting many stores I have begun to think that baking desserts is not a popular activity here.  I have had trouble finding measuring cups and measuring spoons, baking dishes, and many of the spices that I need.  And vanilla extract-almost impossible to find!  I finally tracked down a small bottle in a 'specialty store' and it cost about $20!  For a bottle that would cost $4-$5 in the US.  Needless to say, I will not be baking chocolate chip cookies anytime soon! Most of my frustrations will be solved tomorrow after a much needed trip to Ikea.  As for the vanilla extract, I am still kicking myself for packing so carelessly.

~Rona

Thursday, February 9, 2012

Quinoa Salad with Avocado, Cannied Pecans, and Oranges

I realized that I had 3 random boxes of quinoa sitting around and no recollection of when I bought them.  I think that this says a lot about me: I want to try different food and eat healthier but I tend to get stuck following the same pattern and I have trouble breaking out of it. Oh yeah, and the other thing this says is that I have way too much food in my pantry and I need to finish some!  

Now back to the quinoa, I wanted to experiment and start making new versions of the same basic salad that I usually eat with ingredients that I had available.  I combined quinoa and avocado for a base, the mandarine oranges to add sweetness, and the lettuce and pecans for texture and crispiness.  The salad was really good and was more filling then I had expected.  I think that it is a good starting point and that I will experiment with different ingredients and dressings.


Quinoa Salad with Avocado, Cannied Pecans, and Oranges
Makes 4 portions

1/2 cup quinoa
1 cup water
1/2 avocado, chopped
1/2 cup madarine oranges, cut in half
1/2 cup romaine lettuce, chopped
1/2 cup candied pecans (see recipe here)

For the salad dressing:

1 tablespoon olive oil
1 tablespoon fresh lemon juice
1 tablespoon balsamic vinegar

1.  Rinse and drain the quinoa in cold water before cooking.

2. In a pot, combine the quinoa and water and bring to a boil.  Reduce the flame and cover the pot.  Simmer to quinoa until all of the water is absorbed, 10 to 15 minutes.

3.  Once the quinoa is sufficiently cooled, transfer to a large bowl and toss in the other ingredients.

4.  Combine all of the ingredients for the salad dressing in a small bowl and mix them well.  Pour the salad dressing over the quinoa and toss until well combined.

Enjoy!

Rona

Thursday, February 2, 2012

Spiced Candied Pecans

After experiencing a powerful lethargy for the first few weeks of this year, I was starting to get concerned.  I found myself feeling tired despite getting more than enough sleep, day after day.  Granted, I am sure that this was partly due to mid-winter blues and the normal stress and uncertainty that life throws at us.  But aside from that, I was beginning to suspect that my eating habits may be contributing to the problem.

Remembering the some what ignored goal that I set for myself at the beginning of the year (any one notice the large amount of desserts and baked goods that took over the blog?), I decided that I should actually try to eat healthier.  This probably means different things for different people.  For me, it means eating less sugar and less bread.

To start, I wanted to increase my salad intake.  I actually love salads but I am terrible at making them. Why?  I really have no intelligent explanation, I just don't make them often.  For me, the first step in eating more salads is to make candied pecans.  They are so simple to make and add a nice crunch to a salad.  I tend to change the way I make them each time.  The honey and water is a must but you can play around with the other flavors by adding brown sugar, cinnamon, cayenne pepper or any spice that you want.  I already started to eat more salads this week!


Spiced Candied Pecans

1/2 cup whole or chopped pecans
2 tablespoons of honey
A few drops of water
A dash of cinnamon
A dash of cayenne pepper

1. Preheat your oven to 425 degrees. 

2. Combine the honey, water, cinnamon, and cayenne pepper in a bowl and mix well.

3.  Toss the pecans in the honey mixture and then spread the pecans evenly over a tray lined with aluminum foil.  Pour all of the excess liquid on top of the pecans.

4.  Cook for about 8-10 minutes so that the pecans are softened.  Transfer them from the aluminum foil to a plate to cool immediately.  When the pecans cool on the aluminum foil, they get stuck there and are difficult to remove.

5.  Serve on a salad and enjoy!

~Rona


Thursday, January 26, 2012

Patatas Bravas

I think that I could go to tapas restaurants just for the patatas bravas.  I enjoy tapas but as a self-defined "selective eater" who does not eat seafood or pork, the selection of dishes that I find appealing is small at best.  There are a few dishes that are exceptions but for the most part when I go to a tapas place I am most looking forward to eating the patatas bravas.

Of course, I began to question why I never tried making them myself.  Honestly, I was a little nervous about the aioli sauce.  I had visions of myself making mayonnaise from scratch and ending up sick because I did not do it correctly.  I will continue to leave home made mayonnaise to the professionals.  Instead, I found a recipe for aoili using store bought mayonnaise and I decided to give it a try.  The sauce was actually simple and came out really well.  I served the potatoes with a chili sauce that I have at home; I did not make it from scratch.  So yes, a disclaimer--this is a simplified version of patatas bravas but I am really happy with the way that they turned out.


Patatas Bravas
Makes 4 portions

For the aioli sauce:

1/2 teaspoon salt
2 medium sized cloves of garlic, minced
1/2 teaspoon Dijon mustard
2 teaspoons fresh lemon juice
1/2 cup mayonnaise
1/4 cup olive oil

1. In a blender or food processor combine all of the ingredients and blend until smooth.

For the potatoes:

3 baking potatoes, peeled and chopped into 1 inch long cubes
1 tablespoon salt
1/2 teaspoon pepper
1 teaspoon paprika
1/4 cup of vegetable oil

1.  In a large pot, pour the potato cubes and cover with water.  Bring the water to a boil and cook for 3-5 minutes. 

2.  Drain the water and transfer the potatoes to a large frying pan.  Add the vegetable oil and the spices and cook for 15-20 minutes over medium heat until the potatoes are soft enough to poke a fork through them.

3.  Pour the potatoes over paper towels and allow the liquid to drain.

4.  Serve the potatoes warm with aioli and chili sauce.

Enjoy!

~Rona

Monday, January 23, 2012

Mexican Wedding Cookies

I first tried these cookies in December when Alyssa received them during the blogger cookie swap. Although, I had never tasted them before, apparently many others have. My boyfriend said that they reminded him of cookies that his mother used to bake during his childhood in Turkey.  Friends that tried them said that the cookies tasted similar to desserts that are typical to Italian cuisine. I will call them Mexican Wedding Cookies here but maybe you know them by a different name?

These cookies taste light and sweet and salty at the same time.  The saltiness of the butter stands out for me when I eat the cookies and I quickly decided that I would make a batch for myself.  The cookies are really easy to make and I am really happy with the way that they turned out.  Considering that they are common across various cultures, I hope to try different variations of this same recipe and search for my favorite!


Makes about 20-24 cookies

3/4 cups shortening
1/4 cup butter
(alternatively substitute the top 2 ingredients and just use 1 cup of butter)
1 teaspoon salt
2 tablespoons vanilla
1/2 cup powdered sugar
1/2 teaspoon cinnamon
2 cups AP flour
1/2 cup chopped pecans

1.  Preheat the oven to 325 degrees.  Line a large baking tray with parchment paper.

2.  In a large bowl, blend together the butter, shortening, salt, sugar, vanilla, and cinnamon.

3.  Add the flour and the pecan and mix until they are incorporated.  (The batter will be dry and crumbling).

4.  Take teaspoons of batter and shape them in your palm so that they stay together.  Place the cookies on the baking sheet and bake for 20-22 minutes.

5.  Sprinkle powdered sugar on top of the freshly baked cookies.

Enjoy!

~ Rona


Wednesday, January 18, 2012

Apple Cinnamon Rolls

I remember when I was younger and we took family trips to the mall.  There were some days when we would order a large cinnamon roll from Cinnabon and go home and share it between four people.  Now, when I walk past Cinnabon in a mall food court, I must admit that the smell does tempt me but when I think about all the calories packed into one small dessert, I manage to resist.

However, I came across this recipe on a blog, I could caved in to my Cinnabon craving!  This roll seemed like the prefect combination of sweet without too many calories. Since I always have a supply of puff pastry in my freezer, I made these the very next morning for breakfast.  With the baked apple in the middle they are almost like a mix of an apple pie and a cinnamon roll.  Seriously, it was the perfect breakfast.  I want to make them again and share...so I don't end up eating all of them on my own!


Adapted from the Food Coma.

Makes 9 rolls

1 sheet of puff pastry
1 apple, peeled, cored, and chopped into thin, long pieces
1/4 cup butter
1/2 cup powdered sugar
1 teaspoon cinnamon

1. Thaw out your puff pastry ahead of time, in the refrigerator. 

2. Preheat the oven to 375 degrees.  Melt the butter in a bowl and use a pastry brush to coat the unfolded sheet of puff pastry.

3.  In a small bowl combine half of the powdered sugar and the cinnamon.  Sprinkle the sugar and cinnamon mixture onto the puff pastry.

4.  Place the apple slices at one end and roll up the puff pastry into a log shape.  Cut into one inch thick pieces and place on a baking sheet.

5.  Bake for about 20-25 minutes, until the dough is golden brown.

6.  Make a glaze for the rolls by mixing together the remaining melted butter with the remaining powdered sugar.  Pour over the rolls when they first come out of the oven and serve warm.

Enjoy!

~Rona


Monday, January 16, 2012

S'mores Cheesecake

I had been thinking to make cheesecake from scratch for some time now.  I was a little bit discouraged because Alyssa and I tried to make cheesecake a year ago and failed.  We had expected the process to be simple but somehow the filling did not work and we had to throw it out.  But hey, you never learn if you don't try, right?

Well, in a recent trip to Costco I bought a 3 pound brick of cream cheese.  I eat half a bagel for breakfast several days a week but there was no way that I would be able to finish that monster sized cream cheese on just bagels alone.  So yesterday I finally gathered myself and decided to make a cheesecake.

I had purchased graham crackers and marshmallows recently thinking to make s'mores but came up with the s'more cheesecake idea instead.  I took the filling recipe from the cream cheese box, found the graham cracker crust recipe online, and just decide to throw in the marshmallows and chocolate to spice it up.  Granted this could have been a disaster considering that I had not successfully made cheesecake before but luckily it came out well.

What I learned from the experience is that the marshmallows will bubble up and they come through the cream cheese.  Not a problem for taste but not the best for presentation.  I think that using mini-marshmallows instead of these jumbo ones would solve that.  Also, the cake was a little sweet for me, perfect with unsweetened tea, but sweet when eaten alone.  I think that chopping the chocolate more finely and using less of it would take care of that.  But the good news is that I have finally overcome my fear of making cheesecake and failing!  Now, I just hope this wasn't a fluke and my next cake will taste just as good! 


S'mores Cheesecake
Makes one 9-inch cake

For the crust:
1 1/2 cups of graham cracker crumbs
5 tablespoons of melted butter
3 tablespoons sugar
1 tablespoon of cocoa powder

For the s'mores filling:

Marshmallows
1/4-1/2 cup of finely chopped chocolate (depending on how much you like chocolate/sweetness)

For the cheesecake cake filling:
1 pound of cream cheese, softened
1 teaspoon of vanilla extract
1 cup sugar
2 eggs

The Crust:

1. Preheat the oven to 325 degrees.  In a medium sized bowl, mix together the cocoa powder, sugar, and graham cracker crumbs.  Pour the melted butter over the mixture and toss with a fork until the crumbs are moist.

2.  Pour the crumbs into a 9 inch springform pan.  Press the graham cracker mixture over the bottom and on the sides to form an even thickness crust.  Bake for 10 minutes and then transfer the pan into the fridge to cool.

Cream Cheese Filling:

3.  In a large bowl combine the vanilla, cream cheese, and sugar.  Using an electric mixture, beat the mixture together to soften the cream cheese.

4.  Add the 2 eggs and mix on low speed until the mixture is combine.

The Cake:

6.  Take the pan out of the oven and line the bottom of the crust with marshmallows (I had large ones so I tore them in half and covered the crust).

7.  Sprinkle the bottom with the chopped chocolate.

8.  Pour the cream cheese filling on top of the marshmallow layer and spread it evenly across the cake.

9.  Bake at 325 degrees for 40 minutes, until the center of the cake has solidified (with the marshmallows coming through it may not look solidified but I took it out after 40 minutes and the cake was perfect).

10.  Cool the cake in the refrigerator for 2-3 hours before serving.

Enjoy!

~Rona