Saturday, April 30, 2011

Olive Oil Cake with Cherries


This week has passed by so quickly that somehow I did not have much time to cook.  Still, as the weekend approached, I realized that I was craving something sweet that would not be too unhealthy.  I enjoy baking but I find that so many cake and cookie recipes call for too much butter.  And while the butter makes them good, I prefer to save these recipes for occasions when I can share said cake or cookies with many people to avoid the inevitable guilt that I would feel from eating more than I should!


I am always on the look out for a recipe sans butter or trying to find healthy ways to modify the butter out of a dessert recipe.  I came across this cake recipe online and decided to give it a try.  It is a simple sponge cake with fruit and it comes out moist and is a guilt free less-guilt inducing dessert!  For people who do not like cherries, it is easy to introduce a different frozen fruit into the topping recipe.


Olive Oil Cake with Cherry Topping
Adapted from Williams-Sonoma recipes

Ingredients
Butter to grease the pan
1 1/2 cups flour
1 1/2 teaspoons baking powder
1/2 teaspoon salt
3 eggs
1 cup sugar (I used 3/4 cup)
1/3 cup olive oil
1 teaspoon vanilla extract
2 teaspoons fresh lemon juice
1 teaspoon grated lemon zest

Preheat the oven to 350° F and butter a 9-inch springform pan 

In a medium size bowl sift together the flour, baking powder, and salt.

In a large bowl use an electric mixer on low speed to beat the eggs until they are thick and pale yellow (about 3 minutes).

Continue beating the eggs and add the sugar until combined, followed by the olive oil.  Finally beat in the vanilla, lemon juice, and lemon zest.

Fold the flour mixture into the egg mixture and mix gently until the flour is incorporated.  

Bake on the middle shelf of the oven for 35 to 40 minutes.

Cherry Topping

1/2 cup sugar
1/2 cup water
1 pound of frozen cherries
1 teaspoon flour
1 teaspoon vanilla

Heat the sugar and water in a saucepan over medium heat. Simmer until the sugar is dissolved.  Add the cherries, flour (it helps to thicken the sauce) and the vanilla and cook until the cherries are tender, about 5-10 minutes.

Pour the cherries sauce over a slice of cake and serve immediately.

Enjoy!

~R

Friday, April 29, 2011

Miso Salmon with Edamame Salad

While I am not sure when this situation would ever arise, if someone were to tell me I was only allowed one category of food to eat for the rest of my life-be it meats, dairy, vegetables, seafood-I think I can easily say I'd be content with seafood. While my sister and I disagree on this food category (two minds can't ALWAYS cook alike), I have always loved fish and fish products since I was a child. My mom can attest to memories of me at Russian restaurants relentlessly eating pickled herring as if the world's supply of herring was ending the next day. My love of seafood is my inspiration for today's meal:


Ingredients: Salad
Adapted from Good Housekeeping 

  • 1 bag (16 ounces) frozen unshelled edamame beans
  • 1/4 cup rice vinegar
  • 1 tablespoon vegetable oil
  • 1 teaspoon sugar
  • 3/4 teaspoon salt
  • 1/8 teaspoon ground black pepper
  • 1 bunch radishes, thinly sliced

Salmon
  • 2 tablespoon red miso
  • 1  green onion, minced
  • 1 tablespoon grated, peeled fresh ginger
  • 1 teaspoon brown sugar
  • 1/8 teaspoon ground red pepper
  • 1 salmon fillet with skin


I believe fish is one of the easiest foods to cook and hardest to mess up. It has a relatively short cooking time, and absorbs marinade very well. The miso was a little bit hard to find, but really pulled this dish together. Also, the salad probably serves 3-4, but it is perfect for refrigerating and eating with your next few lunches/dinners. 

Preparation: Salad
1. Cook edamame as directed on the package. After approximately 5 minutes of cooking time, drain the edamame and rinse with cold water to prevent further cooking. 

2. In medium bowl, whisk together vinegar, oil, sugar, salt and pepper. Add the edamame and sliced radishes and toss. You can also garnish with cilantro for extra flavor. 

3. Refrigerate until fish is prepared.

Salmon
1. In small bowl. mix miso, onion, ginger, sugar, and pepper. Rub the mixture on the flesh side of the salmon fillet.

2. Because I don't have grill in my apartment, I broiled the salmon, but you can choose your own method of cooking. To broil, place the skin side on a bottom of a greased pan and cook at 375º until salmon turns opaque and easily flakes when tested with a fork.

3. Serve salmon with edamame salad and you're ready to eat.


Thanks for reading!


~A

Monday, April 25, 2011

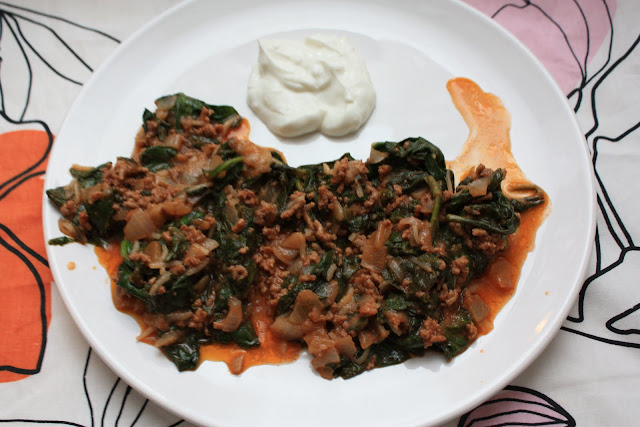
Spinach and Meat

As the weather gets warmer I would rather spend hours outside enjoying the sunlight than being cooped up in my tiny kitchen with no view. So even though I love to experiment when I cook sometimes I just want a quick meal that almost makes itself... or that is easy enough for someone to make it for you :)

This beef and spinach dish does not take a long time to prepare and it is delicious. The yogurt and garlic compliment the meat perfectly. It is a great meal to have on its own or with a side of fresh cooked vegetables or a salad.


Ingredients 
makes 2-3 portions 

1/2 pound of ground beef
1 6-oz bag of fresh spinach leaves
1 tablepoon of white rice
1 large yellow onion, chopped
3 oz of tomato paste
1 container of plain yogurt
2 gloves of garlic

Heat the oil in the pan and add the onion and cook for 3-4 minutes. Add the rice and cook for another 2 minutes.

Add the ground beef and cook for about 5 minutes until the meat is brown.

Add the tomato paste and cook for another 2 minutes.

Finally, add the spinach and about a 1/2 cup of water .  Cook for 5-10 minutes on low heat or until the spinach is soft, stirring occasionally.

While the dish is cooking, crush 2 cloves of garlic and mix it into the yogurt.

Serve the meat and spinach with the yogurt mixture.


~R

Chicken Rolled with Le Gruyère & Sage

For those of you who have an iPhone, I highly recommend downloading the "Whole Foods Recipe" app. That is where I found this delicious recipe. The app allows you to browse recipes based on food preferences and categories, save favorites, and even create shopping lists. And I would probably eat almost everything the app suggests.


Now that my little promo for Whole Foods is over, onto the meal...

This dish has such a rich taste, from the sage to the pan sauce to the wine-soaked shallots, every element of this dish is punched with flavor. And while it may sound a little complicated, I assure you it's pretty easy to make!

Ingredients (serves 2)


2 large boneless, skinless chicken breast (thin sliced)
1/4 teaspoon fine sea salt
1/2 teaspoon freshly ground black pepper
Small block Le Gruyère cheese, thinly sliced
Fresh sage leaves
2 teaspoons extra-virgin olive oil
1 shallot, thinly sliced
1/2 cup dry white wine

Although I try to do most of my cooking on a budget, I don't mind splurging once in a while to try to make something I've never had before. The splurge in this recipe was the cheese. Le Gruyère cost me about $6.99 for a medium sized wedge, but I had never tried this cheese so I was able to justify the cost. And I already had most of the other ingredients in my pantry anyway. Also, where I splurged on cheese, I saved on wine. For the pan sauce, I used Trader Joe's classic "3 Buck Chuck" because that's all I had in my apartment so I needed to be resourceful. Still tasted great!


Procedure

1. Before beginning your preparation, take the cheese out of the refrigerator and let it sit out in room temperature for a few minutes. This softens the cheese and makes it much easier to handle in this dish.

2. Remove the outer 2 layers of the shallot and thinly slice. Take the block of the cheese that should be softened at this point and cut very thin slices. Set these ingredients aside with the sage leaves.

3. This part can be a little tricky, especially in my case because I do not own a rolling pin (an atrocity, I know.) But I'll give you the directions assuming you do own a rolling pin: Place the chicken breast between sheets of wax paper, and roll with a rolling pin. If you need to improvise, a meat mallet works well too. Flatten out the chicken until it is about 1/4-inch thick. Then cut along the length of the chicken into approximately 1/2 inch strips. Season the strips with salt and pepper on both sides. Repeat for the second piece of chicken.

4. Cover each strip of chicken with a slice of Le Gruyère and sage leaves. Roll them up and seal tightly with toothpicks so that they look like this:


5. Heat olive oil in a large skillet over medium heat. Add the rolled up chicken and cook until brown on both sides, turning constantly. As they start to brown, they should almost resemble scallops. Do not worry if some cheese melts onto the pan.

6. Once the chicken has cooked, transfer the chicken onto a plate (cover the plate with a paper towel to drain the excess oil.) Remove toothpicks.

7. Onto the pan sauce...return the skillet to medium heat and add the sliced shallot. Cook the shallot, scraping up brown bits from the pan, for about 2 minutes. Add the wine until most of the liquid has evaporated. I added some chili powder to the wine to achieve the right color and for an extra kick.

8. Pour the sauce over the chicken and you're ready to serve!


~A

Sunday, April 24, 2011

Eggplant with Indian Spices


Oh Little India, the loving nickname given to the town in New Jersey where I grew up. There is a main street that over the years transitioned from the typical American shops like Sears, Blockbusters, and Dairy Queen to Patel's Cash and Carry and Moghul Express.  I bring this up because even though I grew up surrounded by Indian food and many Indian friends, I did not start enjoying and craving the cuisine until maybe two or three years ago.


I like food with spice and some kick to it. I find that Indian-inspired food is relatively easy for me to make, considering that I have access to many Indian products from the markets that are located in my town.

I got the inspiration for this dish after eating at an Indian lunch buffet recently. They had made an eggplant dish which I have not come across before in Indian restaurants.  And honestly, I have felt like experimenting with cooking eggplant more and more recently. While, I cannot remember exactly how that eggplant dish tasted (which means that I will have to make a return trip to that restaurant for lunch some time soon) I decided to improvise using what few memories that I have and my spice collection. Overall, I am happy with the result.


Ingredients (serves 3-4)

1 large eggplant
2 cloves of garlic, diced
1/4 red onion, chopped
1 6-oz can of tomato paste
1 teaspoon garam masala
1 teaspoon curry
1/4 teaspoon cumin
1/2 teaspoon paprika
1 teaspoon salt
1/4 teaspoon pepper
(all spices should be adjusted to taste)

Bake an eggplant in the over for an hour at 375° F. I kept it simple, I just washed the eggplant, left it whole, and then put it on a cookie sheet in the oven.

After an hour, remove the eggplant from the oven and cut it into pieces, removing the skin as you go.

Heat the onion and garlic in a large pan until soft. Add the pieces of eggplant, tomato paste, about a 1/2 cup of water, and the spices. Mix throughly and for 20-30 minutes until the eggplant reaches the desired softness.

Serve immediately.

~R


Friday, April 22, 2011

Spinach Cheese Casserole

It is Passover which means that eating bread, pasta, or legumes (soy, beans, lentils) is prohibited. These food restrictions can limit anyone's cooking creativity or perhaps it can spark new ideas.


Okay, technically this is not a new idea. I have been making this dish for some time now. It is a really good dish, easy to make and even better to eat. Also, it heats up well and can be eaten for several days after it is prepared.

Ingredients (makes 6-8 servings)
4 eggs, beaten
2 10-oz packages of frozen chopped spinach, thawed and drained of excess water
1/2 cup of matzah meal (flour can be used instead)
1 1/2 cups of grated cheese, use a mixture of swiss, mozzarella, muenster, kaskaval, or any other cheeses 1 cup of small curd cottage cheese
1/4 grated parmesan cheese
1/4 teaspoon salt
1/2 teaspoon pepper

Combine all of the ingredients in a bowl and mix well until everything is blended evenly.
Coat a large round baking pan with oil and spread the mixture in the pan evenly.

Bake at 375°F for 40-50 minutes, until the top is slightly brown.


~R

Thursday, April 21, 2011

Shaved Brussel Sprout Salad


We discovered brussel sprouts around Thanksgiving and were completely surprised that this strange, miniature cabbage-like vegetable could taste as good as it does. Until now, our preparation of brussel sprouts has been really boring: mixing the trimmed sprouts with olive oil, salt, and pepper and baking them for 30-40 minutes.

Luckily, Alyssa found a recipe to spice up the way we eat brussel sprouts and I was able to try it.  It involves preparing the brussel sprouts raw and making them into a salad.  When eaten raw the sprouts  taste similar to cabbage so you end up with a cabbage like salad.

Ingredients
1/2 medium red onion, finely sliced
10-12 brussel spouts
1/2 cup of grated parmesan cheese
Juice from 1 lemon
1 teaspoon honey
1 teaspoon mustard
1 tablespoon olive oil
Salt and Pepper, to taste

Soak the slices of red onion in a bowl of cold water for 15-20 minutes, while preparing the salad.

Start by trimming the hard root of the sprout and by peeling off the outer leaves dark green leaves.


Next, thinly slice the sprout and separate the pieces to create a finely chopped slaw.


In a bowl, whisk together lemon juice, honey, mustard, and a pinch of salt and pepper until the dressing solidifies.

Add the drained onions to the brussel sprout slaw and poor the dressing over the salad.  Add the parmesan cheese.


Serve immediately.

~R

Tuesday, April 19, 2011

Quinoa with Thai Flavors

Before this year, I had never made or even heard of the grain-esque crop called quinoa (pronounced keen-wah). It wasn't until last fall, when I took a healthy cooking class, that I first learned about quinoa and its amazing health benefits. I believe quinoa has gained a lot of popularity recently because it is a highly nutritious carbohydrate that provides a much healthier alternative to rice and white pasta. It is high in fiber, which keeps the digestive system running smoothly, is a great source of magnesium, and contains all 9 essential amino acids that are required by the body. I could keep going on and on about the health benefits of quinoa, but if you're interested, here is a great resource: Quinoa & Your Health.

Obviously I was instantly sold on the idea of trying to replace rice with quinoa. I went to the supermarket and bought a box, but for some reason it was left untouched in my kitchen cabinet. I was [mistakenly] under the impression that quinoa is harder to make, when really it's just as simple as cooking rice. So for those of you who were as confused as me, here is a simple recipe for quinoa that works well as a side dish or even an entrée:


Ingredients (makes 6 servings)
Adapted from NYTimes 2008

1 1/2 cups dry quinoa
3 cups chicken broth
1/3 cup minced red onion
1 jalapeño pepper, seeded and minced
1/2 ripe but firm mango, peeled and diced 
3 tablespoons extra virgin olive oil
3/4 teaspoon salt
1 tablespoon + 1 teaspoon lime juice
Approx. 10 fresh basil leaves, finely shredded

I ended up using an entire mango and a little less onion because I prefer the sweet taste of the mango much more in this recipe. But the proportions are really up to the person cooking.

Preparation
1. Rinse the quinoa well in a strainer. This step is very important, because without a proper rinsing, the quinoa will taste too bitter. My method for rinsing is to line a colander with a few paper towels. Add the quinoa and run under cold water for 2 minutes. 

2. Once the water has drained out of the colander, put the quinoa into a medium-sized pot and add 3 cups of chicken broth. 

[*Two things to note: a) The 1:2 proportion used when making rice also applies to quinoa, so since we are using 1 1/2 cups of quinoa, we use 3 cups of chicken broth. b) You can either use chicken broth or just water to boil the quinoa. I prefer chicken broth because it gives the dish much more flavor. But water can most definitely be used to make this recipe vegetarian!]

3. Bring the quinoa to a boil, then immediately reduce to a simmer and cover. Once the water has evaporated, approx 10-15 minutes, remove from heat and fluff with a fork.

4. In a serving bowl, combine and stir the jalapeño, onion, mango, oil, salt, and lime juice. Add quinoa and toss to combine. Add salt to taste.

5. Just before serving, sprinkle in the fresh basil. This dish can be served warm or cold. 

Hopefully you are now inspired to try quinoa!


~A