Monday, December 19, 2011

Candy Cane Cake Pops

The funny thing about sharing a blog with your sister is that I am usually just as surprised as you are to see what Rona posts. I mean it happens more often than you'd believe. We don't live together and don't coordinate recipes, so it's pretty exciting for me to see what she has made. This happened a few weeks ago when I saw that she made cake pops. First, after getting sad that I am not close enough to go to her place to eat them, I decided the only solution would be to try a variation of cake pops myself.


Fun side note--these cake pops were also featured on the Chloe and Isabel blog here!

Ingredients

1 box white cake mix
3/4 cup milk
3 eggs
1 teaspoon vanilla extract
1 cup vanilla frosting (store bought or homemade)
1/2 cup crushed candy canes
Crushed candy canes, red sprinkles, and red frosting for decoration
Lollypop sticks


Procedure

1. Mix the cake mix, milk, eggs, and vanilla extract. Pour into a greased 9x13 baking pan. Bake at 350 degrees for 25-30 minutes until the cake is cooked throughout.

2. Let the cake cool completely. Crumble the cake into small, even pieces and place in a large bowl.

3. Add the vanilla frosting and the crushed candy canes to the cake and mix until a thick dough consistency forms.

4. Shape the dough into evenly sized cake bites and cool in a refrigerator for 1-2 hours, or in the freezer for 20 minutes.


5. At a low heat, melt white melting chocolate. Insert a lollypop stick into each cake bite and dip into the chocolate. Decorate the pops and leave them in the refrigerator until the chocolate hardens.

6. Share the cake pops with family and friends!


Thanks for reading :)

~Alyssa

Dolma, Filled with Rice and Beef

I used to avoid eating dolma but have warmed up to them in the past few years. I think I just wasn't used to eating grape leaves; they do have a pretty distinct taste. However, I do avoid the store made versions, there is just something about them that do not appeal to me. I have since began to make my own dolma. The recipe that I am sharing is one that I created on my own so the amount of spices used are approximate and should definitely be adjusted to taste.


There are many different dolma fillings. I decided to make a meat and rice filling that was sweeter to compliment the saltiness of the grape leaves. To do this, I used dried plums that were chopped up in the food processor for a natural sweetener. Since the plums are very sticky, I had tried to separate them in a bowl before adding them to the rest of the filling mixture so that none of the dolma ended up with huge pieces of fruit.


The only tricky part of dolma is rolling them. It is a little bit time consuming but the process does get faster as you go along. It also takes trial and error to get a sense of how much filling to place on a grape leaf so that it is not falling out. I included pictures of the steps as I rolled the dolma to illustrate how I did it.


1. I place about 1-2 spoons of filling across the widest part of the leaf.


2. I fold in the ends of the leaves to make sure that nothing will fall out and start rolling.


3. I finish rolling them and place the dolma in a large pot.


Ingredients

Grape Leaves
1/2 cup white rice, already cooked
1/2 pound ground beef
1 small yellow onion, finely chopped
6 dried plums, finely chopped in a food processor
1 tablespoon cumin
1 tablespoon coriander
1 teaspoon salt
1/2 teaspoon pepper
1 tablespoon olive oil

To make the filling:

1. In a large pan, heat the olive oil on medium-low heat. Cook the onion for about 5 minutes until the onion is soft.

2. Add the ground beef to the pan and brown the beef. It doesn't have to be fully cooked.

3. In a large bowl, combine, the beef and onions, rice, dried plums, and spices. Mix well.

To roll the dolma (also see the pictures):

1. Lay out one leaf on a flat surface and then place 1-2 spoons of filling along the widest part of the leaf.

2. Fold in the ends to keep the filling from falling out and then roll the dolma completely.

3. Place the dolma in a large pot and cover with water. Heat the water until it boils and then lower the flame to medium-low heat. Cook for about 30 minutes.

To serve: I carefully take the dolma out of the pot with a slotted spoon to drain the liquid. Some of them will fall apart which is okay. They can be eaten plain or with plain yogurt.

Enjoy!

~Rona

Sunday, December 11, 2011

The Great Food Blogger Cookie Swap Reveal

Today's the day!! I finally get to reveal the cookies that Rona and made for this year's Food Blogger Cookie Swap. For those of you just hearing about the swap, it's this adorable idea started by Julie of The Little Kitchen and Lindsay of Love & Olive Oil.

The concept of the cookie swap is this: Receive the addresses of three other food bloggers. Send each of them one dozen delicious homemade cookies. Receive three different boxes of scrumptious cookies from other bloggers. And finally, post your cookie recipe on your blog.

I've had about a week and a half of gorging on delicious cookies, so it's about time I share/hit a gym.

The cookies that Rona and I chose to make are.....drum roll please......rugelach!


Rugelach is a traditionally Jewish pasty that has a croissant-like shape and can be made with a variety of fillings. The fillings we used in our rugelach pastries were nutella apricot & pecan and strawberry walnut & apricot. It was our first time making rugelach, and between the 72 cookies we needed to make for the blog and additional 30 something we made for family, the kitchen was kind of a disaster. The rugelach on the other hand was not.

Dough Ingredients
1 cup butter or margarine (2 sticks), softened
1 package (8 oz) cream cheese, softened
3/4 cup granulated sugar
1 teaspoon vanilla extract
1/4 teaspoon salt
2 cups all-purpose flour

Filling Ingredients
Nutella
Strawberry Jam
1 cup walnuts, chopped
1 cup pecans, chopped
3/4 dried apricots, chopped
1/4 cup backed brown sugar
1/2 teaspoons ground cinnamon


Procedure

1. Prepare dough: In large bowl, use a mixer to beat butter and cream cheese until creamy. Beat in sugar, vanilla, and salt. Beat in one cup flour. With wooden spoon, stir in remaining cup of flour until mixed well. Use your hands if necessary.

2. Divide your dough into four even quarters. Wrap each quarter and refrigerate until firm.

3. Prepare filling: In medium bowl, combine walnuts, apricots, brown sugar, a little granulated sugar and cinnamon until well mixed. Rona and I made 2 variations of this filling, but there's a lot of room to be creative. We alternated nuts and spreads between these fillings but the rest of the ingredients remain the same.

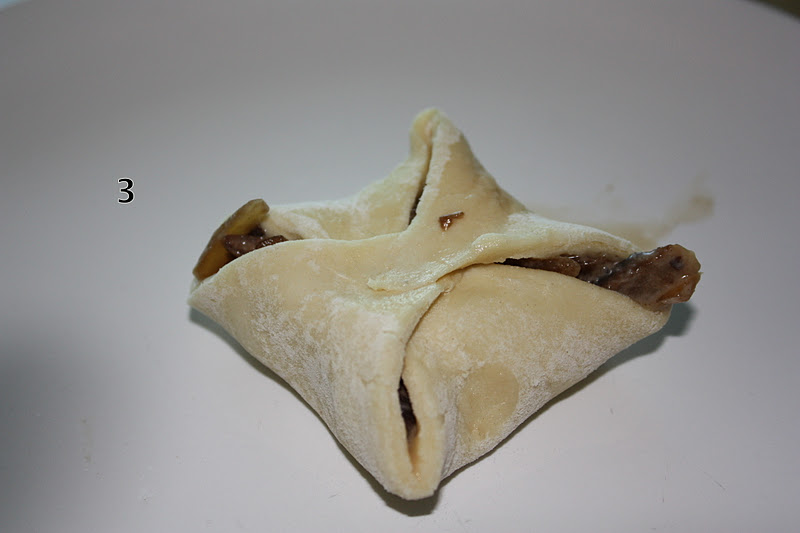
4. On a floured surface, use a rolling pin (also floured) to flatten your dough into a even round. The size of this round will determine the size of your cookie. We went for about 9-inch rounds. Evenly spread either nutella or strawberry jam (depending on which filling you chose) over the dough. Sprinkle evenly with your nut mixture, gently pressing to make sure it stays.


5. At this point in the process, your rugelagh will look like an uncooked pizza. Use a pastry wheel to cut your dough into 12 even slices.

6. Starting at the curved end, roll up your rugelach in a croissant-like fashion.


7. Place cookies an inch apart onto a greased cookie sheet. Repeat with next 3 quarters of dough.

Feel free to get creative with fillings if you choose to try to make this! They were a lot of fun to prepare and it was even more fun to participate in the cookie swap.

So back to the swap...we have some thank yous to give out. Rona and I have received some really great cookies from food bloggers from all over the country. It's rare that I get packages that aren't from Piperlime or Amazon or any other retailer...online shopping addict right here.

Rona and I would like to say a big thank you to those people who made us these amazing cookies. We can't wait to see the recipes!


Not everyone gave us a link to their blog but for those of them that did, here is a little shout out.

Becky--http://thecerealbaker.blogspot.com
Elise--http://theculturaldish.blogspot.com
Callye--http://www.sweetsugarbelle.com
Elena--http://twinklemaroon.blogspot.com/

Becky, sorry that your cookies were not included in the pictures. Since Rona received them first, they were all gone by the time that we realized that we should take pictures!

Sorry for missing the other 2, I didn't catch the name of your blog, but if you post a comment with the name, I'll make sure to edit.

Thanks for reading!

~Alyssa

Guilt Free Spinach & Artichoke Dip

Spinach and artichoke dip is one of those things that I like to pretend is healthy. It has veggies in it so it has to be good for you, right? It's like crediting a bowl of ice cream as your daily dose of dairy. It has milk in there somewhere, that's got to count for something. Unfortunately, that logic doesn't make sense. The spinach and artichoke dip that you typically order from restaurants is insanely fatty. I don't even count calories but when the restaurants do choose to list calories on the menu, I'm usually turned-off when I realize the dip is something like 1/4 of my recommended daily calorie intake.


So rather than discount spinach and artichoke dip from your life completely, I am here with a solution. This is a recipe I learned from a healthy cooking class in college. I'm completely aware that there isn't a perfect substitute for mayo, sour cream, and cream cheese, but this dip still has a great taste and can be eaten without the "wow I shouldn't have done that" feeling afterwards.


Ingredients (serves 8)

8 oz silken tofu (half of the package)
6 oz plain non-fat Greek yogurt
2 garlic cloves
1/2 teaspoon onion powder
Pinch of cayenne pepper
1 can quartered artichoke hearts, drained, rinsed and chopped
1 cup frozen spinach, thawed and squeezed dry
1/2 cup Parmesan cheese


Procedure

1. Preheat your oven to 400 degrees.

2. As the oven heats, use a blender to puree the tofu, yogurt, garlic, onion powder, and cayenne pepper.

3. Transfer to a bowl and mix in the artichoke and spinach and half of the Parmesan cheese. Mix well.

4. Transfer the mixture into a medium-sized baking dish. Spread evenly and top with the remaining cheese.

5. Bake uncovered for 20 minutes.

6. When done, serve your dip hot with pita chips (I used whole-wheat pita cut into small pieces and baked in the oven), endive leaves, slices of bell pepper, and carrots.


My friends have tried this dip and loved it. While the flavor is noticeably different from standard spinach and artichoke dip, it's delicious nonetheless. Don't be turned-off by the tofu. You can barely taste it!


~Alyssa

Monday, December 5, 2011

Brown Lentil Soup

Before I share this recipe, I’d like to preface first that I am letting you guys in on a nice little family recipe. For as long as I can remember, my dad has been making us red & brown lentil soup. Rona blogged about the red lentil here, but because the tastes are so different, I figured I’d also share brown lentil soup with you all. I feel like I’m sharing a piece of my childhood, so take good care of it!


Reasons I like this soup. 1) It’s filling because lentils are a great source of protein. In fact, according to my wiki app that I have pulled up right now, lentils have the third-highest level of protein, by weight, of any plant-based food. Thank you wiki. 2) It’s delicious. That’s good enough for me.

Ingredients

3 cubes Knorr beef bouillon
2 large carrots, diced
3 large sticks celery, diced
1 large yellow onion, diced
4 garlic cloves, minced
1 tbsp olive oil
2 cups uncooked brown lentil, rinsed
1 can (14.5 oz) stewed tomatoes
1 tsp kosher salt
Pepper to taste
2 bay leaves
1 tsp cumin
2 large tomatoes, cut into cubes


Procedure

1. Fill a 6-quart pot with water, about 3/4 of the way.

2. Add 3 cubes of beef bouillon and bring to a boil.

3. While waiting for the water to boil, prepare the diced vegetables and heat 1 tablespoon of oil in a medium-sized pan. Add the carrots, onion, celery, and garlic to the pan and fry until lightly brown.

4. After this is done (or before), open your can of stewed tomatoes and blend in a food processor until smooth. This step is to avoid tomato chunks in the soup.

5. Once the water is boiled and the bouillon cubes are dissolved, pour the stewed tomatoes and lightly fried vegetables into the soup. Add the lentils, salt, pepper, bay leaves, and cumin. Stir well and reduce heat, letting the soup simmer for 1 hour.

6. In the meantime, prepare your potatoes. After an hour, add the potatoes to the soup and cook for another 15 minutes until the potatoes are soft (test with a fork.)


And that's all!

~Alyssa


Sunday, November 27, 2011

Eggplant Salad

What to do when you have an eggplant, want to make a light lunch, and do not want to repeat tried recipes? The solution? Making an easy eggplant salad that would work great as an appetizer or as a meal on its own.

I have several eggplant recipes on the blog already that I prepare often and some recipes that never made it on the blog because I did not manage to photograph them before the food disappeared... Hmmm, I probably should make those ones again!

I made this salad without following a recipe so there is room to play around with the portions and the ingredients. I was inspired by the salads that are so common in Middle Eastern cuisine and in the Turkish and other restaurants that I go to. Those are probably prepared with grilled eggplant but I baked it for this recipe. I also used a decent amount of olive oil but it can be adjusted according to taste, along with the other ingredients. I think that is what makes a salad like this so great, you can play around with it and make it your own.

Lets just say that it was a good thing that I got in some pictures of the salad, and at a good time of the day, because it did not last long. Eaten with some bread and cheese and I had no problem getting full.


Eggplant Salad
Makes 4-6 portions

Ingredients

1 large eggplant, with or without skin, chopped into cubes about 1 inch thick
2 plum tomatoes, left whole
3 whole cloves of garlic, peeled
1 teaspoon paprika
1/2 teaspoon chili powder
1/2 teaspoon cumin
Fresh parsley, chopped
Fresh lemon juice
1 teaspoon salt and 1/2 teaspoon pepper or to taste
Olive oil

1. Preheat your oven to 350 degrees and line a tray with parchment paper.

2. Toss the eggplant and garlic pieces with 2 tablespoons olive oil and the paprika.

3. Cook for about 30-35 minutes and then add the 2 whole tomatoes to the oven.

4. Cook for another 15 minutes, the eggplant and tomatoes should be soft. You want to be able to stick a fork in the eggplant easily. If the eggplant needs more time, remove the tomatoes and continue to cook the eggplant until it is soft. (I do no think the tomatoes should get too soft for the salad.)

5. Remove from the oven and let vegetables cool. Remove the seeds from the tomato and cut the rest of it into small pieces. Also, cut each piece of eggplant even smaller into about 4 pieces. Take the garlic cloves and squeeze out the softer garlic so that it can be incorporated evenly in the salad.

6. In a bowl, toss the tomatoes, eggplant, and garlic with 1 1/2 tablespoons olive oil, 2 tablespoons lemon juice, parsley, cumin, chili pepper, salt and pepper.

Enjoy!

~Rona

Sweet Potatoes with Pecans and Parmesan

Another successful Thanksgiving come and gone. Enjoyed time with my family? Check. Ate to the point of pain? Check. Had a tryptophan-induced nap after dinner? Check.

I really do love this holiday. It's every foodie's wildest dreams: cook for hours and eat til your body simply cannot take anymore. And as you digest, you take time to be thankful for what you just ate and for all of the great people surrounding you. Oh and then comes Black Friday, a day when I get to be thankful for great deals and less-than-normal damage to my bank account.

This Thanksgiving, Rona came home with her boyfriend, and together we fought for counter space with our dad as the 3 of us ran around the kitchen preparing food. The first dish that I made was actually a recipe given to me by my coworker during our office's Thanksgiving potluck. It's incredibly simple to make and is as delicious as it is easy. 


Ingredients (serves 6-8)

3 tablespoons olive oil 
4 large sweet potatoes, peeled and sliced into 1/4-inch-thick rounds
1/2 cup grated Parmesan
Kosher salt and black pepper
1/2 cup chopped pecans
1/4 cup brown sugar
2 teaspoons fresh thyme leaves (or dry for the flavor)
pinch of cayenne pepper

Procedure

1. Heat oven to 375 degrees. Grease a medium sized baking dish with oil.

2. In the baking pan, toss the sweet potato rounds with the Parmesan, 2 table spoons of oil, salt, and black pepper so the potatoes are evenly coated. Cover the dish tightly with foil and bake for about 30 minutes.

3. While the potatoes are baking, combine the pecans, sugar, thyme, cayenne, remaining tablespoon of oil, salt, and black pepper in a small bowl. Cayenne pepper is very spicy so make sure to only use a pinch.

4. After 30 minutes, remove the foil from the baking dish, sprinkle the pecan mixture over the potatoes, and continue to bake, uncovered, until the pecans are toasted, approximately 10-15 minutes.

- - - - - - - - - - - - - - - - - - - - - - - 

And continuing on that Thanksgiving spirit, Rona and I have randomly selected a winner for our Chloe & Isabel giveaway. We are thankful for our readers and appreciate all of your incredibly nice comments!


Using Random.org, we have selected #21--Carly of http://www.thirtysomethingfashion.com as the lucky winner! Thanks Carly & everyone else for making our first giveaway a success. 

~Alyssa

Wednesday, November 23, 2011

Spicy Mushrooms with Bulgur Pilaf

I almost gave up cooking with jalapenos recently.  I really like adding jalapeno pepper to dishes to add some natural spice to a meal.  The last time I worked with the peppers, I removed the seeds with my bare hands.  Then for the rest of the night, every time I touched my face my skin started burning from the juice.  It was not terrible...I can handle a little bit of discomfort.  Several hours later and several attempts at washing my hands with a lot of soap, as well as a shower, I thought that I was safe.  And then I tried to take out my contacts and it was not a good experience. 

So my lesson of the day is: Handle jalapeno peppers with care!  And don't touch your eyes after working with a jalapeno pepper!

Luckily, for the next meal involving jalapeno peppers, my boyfriend was willing to help out.  (If not, I would probably be slicing away while wearing heavy duty gloves!)  This dish is his recipe, inspired by his mother's home cooking in Turkey.  It is really delicious but definitely spicy.  But the best part is that it is easy to make!  It is one of my favorite dishes for a quick, low-effort dinner!

P.S.- Don't forget to enter our giveaway before it closes on Friday.

Also, I wanted to let everyone know that you can get 25% off your total purchase at chloe+isabel by shopping through my boutique (make sure that you see http://ronapeltzer.chloeandisabel.com in the url)!

Just enter cifriends in the offer code box when you get to the payment information page!  The code is valid from today through 11/28 at midnight. 
This is the first time that chloe+isabel is offering a large discount on their jewelry so it is a great time to buy some holiday gifts if you are interested!


Spicy Mushrooms
makes 3-4 portions

Ingredients
3-4 large portabella mushrooms, cut into small pieces
(you can also use different types of mushrooms, I have used one box of white mushrooms)
2 small jalapeno peppers, sliced into rounds
(if you do not like spicy food, I recommend using green pepper sliced into small pieces or less jalpeno pepper)
1 small yellow onion, chopped
3 tablespoons of tomato paste
1 teaspoon of salt
1 teaspoon of pepper
1 tablespoon olive oil
4-5 Kaskaval cheese or your favorite cheese

1.  In a large pot, heat the olive oil.  Cook the onions for 3-5 minutes, until soft.

2. Add in the mushrooms, pepper, tomato paste, salt, and pepper, and stir to combine everything.  Cover the pot and cook on low heat for 15-20 minutes until the mushrooms get soft. 

3.  Add a few slices of your favorite cheese and serve over bulgur pilaf.

Bulgur Pilaf
makes 3-4 portions

Ingredients
1 1/2 cups coarse bulgur pilaf (I use this brand but you can probably find different brands in your local market)
2 tablespoons olive oil
Water

1. In a large frying pan, heat the olive oil.  Fry the bulgur pilaf in the olive oil for 3-4 minutes.

2.  Pour enough water over the bulgur to cover the bulgur entirely.  Cook over low heat until the water evaporates, about 8-12 minutes.  When most of the water evaporates try the bulgur to make sure it is soft.  If not add more water.

3.  Once the water evaporates and the bulgur is soft, add a little bit of butter (I do not use a lot but it is up to personal taste) and mix it into the pilaf.

Enjoy!

~Rona

Sunday, November 20, 2011

Mercimek: Red Lentil Kofte

While traveling in Turkey over this past summer, I tried bulgur starters that looked liked someone had gotten angry, begun to close their hand into a fist, and then stopped half way.  They were really good but I figured that they would too labor intensive, since each piece needs to be formed by hand. 

Recently, at a Turkish restaurant in Manhattan, I ordered 'red lentil balls' not exactly knowing what to expect but wanting to try something new.  When the starter came out, there was the red lentil, shaped in the same way as the bulgur that I ate in Turkey.   I would say that red lentil balls is not the best way to describe this so I am introducing the Turkish word for lentil, Mercimek, and also calling it lentil kofte (kofte is usually used for round or long ground meat dishes and also applies to the shape of the lentil here).

Well, I got home and realized that labor intensive or not, I loved cooking with red lentil too much not to try this dish.  I came up with my own recipe for making these including parsley, cumin, and chili powder, all commonly used in Turkish cuisine.  The good news, these were actually very easy to make.  Much faster than making dolma (which I also made recently and will post about later this week). This is a great, easy dish that can be served as a starter.  Just add lemon slices and sprinkle them with lemon juice for extra flavor!

And PS: Don't forget about our jewelry giveaway that is closing on Friday of this week!


Ingredients
Makes about 20-24 pieces

1 cup red lentil
1 cup water
3 tablespoons tomato paste
1 small yellow onion, grated
3 garlic cloves, minced
1/4 cup freshly chopped parsley
1 tablespoon cumin
1 tablespoon chili powder
1 teaspoon salt
Fresh lemon slices

1.  In a small pot, over low heat, cook red lentil for about 15 minutes, until most of the water is gone.  The lentil should be soft but not too mushy.  Let the lentil cool for 20 minutes, until it can be handled.

2.  In a mixing bowl, combine the lentil with the tomato paste, grated onion, garlic, parsley, and spices.  Mix together until well combined.

3.  Shape each piece by rolling a small portion in your hand.  Spread your fingers apart and press them into the lentil to create the shape.

4.  Serve at room temperature with lemon slices.

Enjoy!

~Rona

Thursday, November 17, 2011

Raspberry Cheesecake Cake Pops

I love the idea of a bite sized dessert so I made these over the weekend.  I bought a cake bite book and cookie sticks recently and I was really excited to try a recipe.  These cake pops are really easy to make, the recipe calls for a box of cake mix.  This is a great recipe for people who do not like to bake or are baking beginners!

I was a little bit worried about using a cake mix, I think that boxed cake mix has a distinct flavor to it.  I considered making my own yellow cake but I just ran out of time.  Luckily, I found that the cake still tasted great.  When combined with the raspberries and the cream cheese, I couldn't even tell that it was from a mix.

The only other tricky part was coating the cake pops in chocolate.  I tried to melt white chocolate at first but it burnt easily and became lumpy.  Definitely not what I was looking for!  Luckily, I had milk chocolate on hand.  I put it in an aluminum bowl on top of a tea kettle.  I let the boiling water from the tea kettle melt the chocolate and I added 2 teaspoons of vegetable oil.  By removing the chocolate from direct contact with the heat, it did not burn and maintained a smooth consistency. 

I used sticks to stick into the dough and to dip into chocolate, giving it more of a candy-like feel.  But you can also use a fork to dip the dough into chocolate and make these into cake bites!  And of course there are endless ways to decorate them!  I think that these are such a fun treat especially for any upcoming holiday parties!


Makes between 24-30 cake pops

1 box white or yellow cake mix
3 eggs
1 cup milk
1 box (8 oz.) cream cheese, softened
1/2 cup fresh raspberries, mashed (or frozen raspberries, thawed and squeezed dry)
1 pound of white or milk chocolate
1-2 teaspoons of vegetable oil

1.  Preheat the oven to 350 degrees.  Grease a 9x13 baking pan.

2. In a large bowl, mix the cake mix, eggs, and milk together and pour it in a baking pan.  Cook for 20-25 minutes until the cake springs back when touched.

3. Remove from the oven and let the cake cool completely.  Remove any brown or burnt spots and crumb the cake into small pieces and place them in a bowl.

4.  Add the raspberry cake cream cheese to the cake mixture and mix together until a thick dough forms.

5. Shape into evenly sized cake bites and cool in the refrigerator for 1-2 hours.

6.  Melt black or white chocolate over boiling water.  Mix in 1-2 teaspoons of vegetable oil and keep the chocolate warm to maintain a smooth consistency.

7.  Insert the cake stick into the dough and dip it in chocolate.  Place the cake pops on parchment paper and chill in the fridge until the chocolate hardens.

Enjoy!

~Rona

Tuesday, November 15, 2011

Mushroom Bites

I probably spent the majority of the weekend cooking...which I expected.  But in the end, we were able to have a fun party and celebrate my boyfriend's birthday as he deserved.

Of course the weekend was not without problems.  There were some unexpected transportation difficulties which almost made our apartment unreachable.  We were sitting around wondering why our friends were all so late!  Luckily most of them arrived after a tiring train ride (thank you, path) and for those that didn't, we got to see them the following day!  We are luck to have great friends who are willing to come to visit us!

I experimented with several new ideas this weekend.  The first is this mushroom puff, I found the idea online and then I made my own version of the recipe.  I actually made these twice since they were so good!  By combining soy sauce, balsamic vinegar, and honey the mushrooms end up tasting salty and sweet at the same time which I love!  Also, I added heavy cream and egg yellow to the mushroom mixture to give it a slightly heavier consistency.  I really had fun making these pastries, I love the shape of them and I think they make a perfect appetizer.  The only tricky part is to drain as much excess liquid as possible.  When I was putting the mixture on top of the dough, the liquid started to get on the dough and I had to soak it up with paper towels.  I think it is inevitable that there will be excess liquid but it evaporates entirely while baking and the pastry doesn't taste soggy at all!  

This is another great puff pastry recipe!  I love how quick these pastries are to make once you get the hang of working with the dough! 


1 box of puff pastry dough
1 small carton of mushrooms, finely chopped
1/2 medium yellow onion, finely chopped
1 tablespoon olive oil
1 tablespoon soy sauce
1 tablespoon balsamic vinegar
1 tablespoon honey
about 1/8 cup of heavy cream
1 egg, separated

1.  In a medium sized frying pan, heat the olive oil.  Cook the mushrooms and yellow onion on low heat for about 10 minutes until the mushrooms soften.

2.  Add the soy sauce, balsamic vinegar, and honey and cook for another 5-10 minutes to let the liquid evaporate.

3.  Drain as much liquid as possible from the pan and transfer the mushroom mixture to a small mixing bowl.  Combine with the whipping cream and the egg white and let cool.

4.  Preheat the oven to 375 degrees and line a pan with parchment paper.

5.  Unfold the puff pastry dough and cut into roughly square shapes.  2 sheets of dough yielded 18 pieces for me.

6.  Again drain as much liquid as possible from the mushroom mixture.  Put about 1 teaspoon worth of mushrooms in the center of the dough.

7.  Fold 2 corners of the dough together and press them to keep it closed.  Fold the other 2 corners to the center and press the dough together.

8.  Coat the top of the pastry with the egg yellow.

9.  Bake for about 30-35 minutes or until the pastry is golden brown.

Enjoy!

~Rona

Friday, November 11, 2011

A Busy Week and a Giveaway!

It has been a busy week with not a lot of cooking or creativity on my part!  This weekend is my boyfriend's birthday and we are going to be hosting a small get together in our apartment to celebrate.  And of course by small, I really mean that I will probably make way too much food and spend a lot of energy.  I love entertaining but do not do it often, so I tend to go all out when I get the chance.  My plans for the weekend include making a lot of new appetizers, drinks, and decorating! I look forward to sharing my new ideas and recipes with you soon!

Since I am busy not cooking right now, I instead want to share Two Minds Cook Alike's very first giveaway!

But first, thank you to everyone who stops by the blog!  Alyssa and I really enjoy sharing recipes and stories with everyone and we love getting your comments on our posts!

I am really excited to be giving away 2 beautiful necklaces from a company that I have been working for called chloe+isabel.    The company sells affordable and high quality jewelry that is a great mix of classic and trendy pieces.  The two necklaces for this giveaway represent both styles.
You can keep one for yourself and give one as a present this holiday season...or if you are anything like me, just keep them both for yourself!

Edit: Get 25% off your total purchase at chloe+isabel by shopping through my boutique (make sure that you see http://ronapeltzer.chloeandisabel.com)! Just enter cifriends under offer code when you get to the payment information page!  The code is valid from today through 11/28 at midnight.  Stock up early on holiday gifts!

This is the first time that chloe+isabel is offering a large discount on their jewlery so if you were on the fence about buying something, it is a great time to buy!

Chloe and Isabel


 You can get more details about the necklaces from the website here and here.

 The giveaway will be open for 2 weeks until Friday, November 25th at 12pm.
The winner will be chosen at random and announced in the following blog post.

Open to US and international readers!
To enter:

1. Follow two minds cook alike
2. Visit chloeandisabel.com and leave a comment on this post of your favorite piece!

For extra entries:

1. Follow Rona on twitter! (please write an extra comment)
2. Follow Alyssa on twitter! (please write an extra comment)


Please feel free to email me at twomindscookalike@gmail.com with any questions or comments!


~Rona

Sunday, November 6, 2011

Tomato Cheddar Soup

It's hard to replicate the happiness I feel on a cold fall day with a warm bowl of delicious soup. It's just confirms my love for this season and the fact that I could never move somewhere too far south where you don't get true autumn months.

My idea for this soup actually came from a co-worker. We were ordering from Hale & Hearty during one of our meetings, and she said I really should try the tomato cheddar soup. I'm not the biggest fan of tomato soup myself, or at least I never used to be. This Hale & Hearty soup was seriously incredible and is definitely enough to convert tomato disbelievers.


Ingredients (serves 6-8)
2 tablespoons olive oil
1 medium sized yellow onion, diced
3 stalks celery, diced
2 teaspoons minced garlic
2 cans whole peeled tomatoes
3 cups chicken or vegetable broth
Fresh thyme
1 cup whole milk, cream or half-and-half (I went for milk, the least fatty option of the 3)
2 cups sharp or extra sharp cheddar cheese
Salt and pepper to taste


Preparation
1. In a large pot, heat 3 cups chicken stock. I prefer homemade of course but whatever is easiest.

2. In a medium sized saute pan, add 2 tablespoons olive oil or butter. Add celery, onion, garlic and cook for 4-5 minutes, until lightly browned. You can also add flour here, which will ultimately make the soup a bit more thick.

3. Add the sauteed vegetables to the broth. Next add 2 cans of tomatoes including the juice and the thyme, stirring well.

4. Bring the mixture to a boil, reduce heat, cover, and let simmer for approximately 25 minutes, stirring occasionally.

5. After approximately 25 minutes, remove the thyme stem and puree the soup mixture with a blender. Make sure to do this in several batches to guarantee the soup is well blended.

6. Return to the pot and add milk and cheese, and heat until the cheese is melted well. Season with salt and pepper and garnish with cheese before serving.


Aren't the fall months just the greatest?

~Alyssa

Friday, November 4, 2011

Cranberry-Orange Sauce


For years, when we had Thanksgiving dinners, we would eat turkey with gravy or that cranberry jelly that comes from a can.  Often, there would be an extra jelly can that wasn't consumed on Thanksgiving and ended up sitting in the kitchen closet for months.  There was always something about this cranberry jelly that I didn't like, even though I can't remember ever actually trying it.  (Anyone else do that?  Decide that they don't like a food without even trying it first?)  Anyway, this over-processed cranberry sauce never appealed to me.  


Last year, on Thanksgiving I finally made my own cranberry sauce that is far better than the canned variety.  The sauce combines fresh cranberries and mandarine oranges and is such a simple recipe to master.  You do not need to spend a lot of time or energy preparing this sauce.  The recipe below is just a guideline because there will probably be some adjustments made along the way.  I remember when I made it last year, the outer shell of the cranberries did not break on their own and I had to use a spoon to mash them.  However, this time, they came apart on their own.  Depending on the cranberries, they may need more or less time to soften than my experience.  And of course, the amount of sugar needed will depend on your personal taste. 


I think this is such a delicious sauce, that would be great on meat and even on a dessert like plain cheesecake!


Ingredients

1 bag of fresh cranberries
1/3 cup water
1 can of mandarine oranges, drained of liquid
1/4-1/2 cup sugar
1 tablespoon lemon juice
1 cinnamon stick
1/4 cup finely chopped walnuts (optional)

1.  In a small pot or saucepan, combine the cranberries, cinnamon stick, and water and simmer over low heat for about 15 minutes.  The cranberries should be beginning to soften at this point and before adding the other ingredients.  Stir occasionally and add more water if the cranberries are sticking to the pot.

2.  Add the oranges and lemon juice.  Sweeten with the desired amount of sugar and add walnuts if desired.  Continue simmering until the cranberries are completely softened and the outer shell has broken apart.  This may take an extra 10-15 minutes, depending on the cranberries.

3.  Remove the cinnamon stick and serve with meat or with a dessert.

Enjoy!

~R


Monday, October 31, 2011

Halloween Cupcakes

Happy Halloween everyone! I don't know where you are all reading from, but the Northeast had some pretty nasty weather this past weekend. Not nasty enough to ruin all the fun, though.

Last Friday, my office had a Halloween luncheon with delicious Mexican food and homemade desserts. In the hopes of finding something festive to bake, I made these cupcakes. They were just chocolate and vanilla flavored in the interest of saving time, but the fun is really in the decorations.


I used vanilla frosting and a few different pastry bag tips to make the mummy and spiderweb cupcakes. Actually, correction--Rona decorated the spiderweb cupcakes. I needed as many hands on deck as possible.


Everyone in the office seemed to love the decorations, so all-in-all a success! Anyone have any other fun cupcake decorating ideas?


~A